Mastering the Wood Acrylic Glow Lamp Laser Cut CNC Project
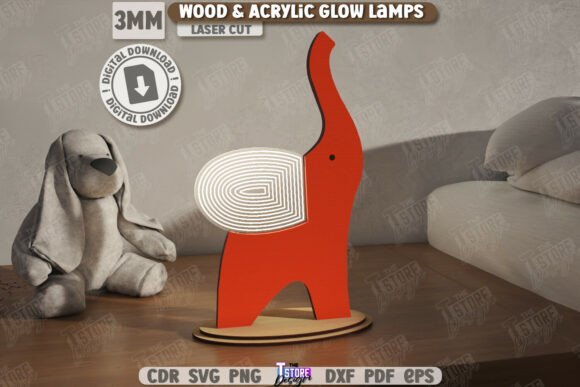
The intersection of warm wood tones and modern acrylic lighting has created a surge in demand for decorative night lights, particularly for children’s rooms and cozy home corners. A Wood Acrylic Glow Lamp Laser Cut CNC project is more than just a trending item on social media; it is a testament to the precision capabilities of modern digital fabrication. For makers, entrepreneurs, and hobbyists, these lamps represent an excellent opportunity to create high-value, personalized décor. However, the difference between a professional-grade product and a frustrating failure often lies in the preparation and file handling.
Many creators dive into laser cutting with enthusiasm but overlook the technical nuances that ensure a perfect fit and finish. This guide aims to clarify common pitfalls associated with designing and producing these layered light fixtures, helping you avoid wasted materials and ensuring your final product glows exactly as intended.
Understanding the Material Interaction
Before sending any file to your machine, it is crucial to understand how wood and acrylic interact under laser influence. These lamps typically rely on a sandwich construction: a wooden base or frame that provides structural integrity and warmth, paired with acrylic panels that diffuse LED light. The aesthetic appeal comes from the contrast between the opaque, textured wood and the translucent, glowing acrylic.
A frequent misunderstanding is treating both materials identically in terms of power and speed settings. Wood absorbs laser energy differently than acrylic. If you apply the same settings to both, you risk charring the wood excessively or failing to cut the acrylic cleanly. Furthermore, the "glow" effect is dependent on the quality of the cut edges. Rough or melted edges on acrylic will scatter light unpredictably, diminishing the visual clarity of your design. Always test your settings on scrap pieces of the exact thickness you intend to use. This small step saves significant time and material costs in the long run.
The Critical Importance of File Formats
One of the most overlooked aspects of downloading digital designs is the file format. When you purchase a Wood Acrylic Glow Lamp Laser Cut Home Décor package, you are typically provided with a zip archive containing multiple formats: SVG, EPS, PNG, PDF, and DXF. While it might be tempting to grab the first file that opens in your software, this choice can drastically affect your outcome.
Vector files like SVG and DXF are essential for laser cutting because they define paths rather than pixels. However, not all vector files behave the same way across different software platforms. A common issue arises when using SVG files with Lightburn, a popular laser control software. SVGs can sometimes suffer from dimension distortion upon import, leading to parts that do not fit together. If a tenon is slightly too large for its mortise due to scaling errors, the entire assembly fails.
To avoid this, experienced users recommend using the DXF file format when working with Lightburn. DXF files tend to maintain their dimensional accuracy more reliably, ensuring that the intricate tabs and slots of your lamp align perfectly. If you are using other software, verify the scale immediately after import by measuring a known dimension against your material thickness. Never assume the file is correct straight out of the download folder.
Interpreting Cut and Engrave Lines
Digital files for laser cutting often use color coding to distinguish between operations. In many standard designs, including those for animal-themed LED night lights, you will see specific instructions such as RED line - CUT and BLACK line - ENGRAVE. Ignoring these distinctions is a recipe for disaster.
If you send a black engraving line to the cutter, you may inadvertently cut through a part that should remain solid, destroying the structural integrity of the lamp. Conversely, if you attempt to engrave a cut line, you will only score the surface, leaving the piece attached to the waste material. Before starting the job, always review the layer settings in your software. Assign the correct power and speed parameters to each color layer. For instance, cutting usually requires higher power and slower speeds, while engraving requires lower power and faster speeds to achieve a clean mark without burning too deeply.
Additionally, check for overlapping lines. Sometimes, design files contain duplicate vectors that can cause the laser to pass over the same spot twice, resulting in excessive charring or widened kerfs. Use your software’s optimization tools to remove redundant paths before cutting.
Design Compatibility and Machine Limits
Not every laser cutter is created equal. While a design may look stunning on screen, it must be compatible with your specific machine’s capabilities. Key factors to consider include the work area size, the laser’s wattage, and the type of laser source (CO2 vs. Diode).
For example, diode lasers often struggle with clear acrylic unless it is specifically marked for diode compatibility. If you are using a standard diode laser, ensure your acrylic is opaque or colored to absorb the laser wavelength. CO2 lasers, on the other hand, handle clear acrylic with ease but may require air assist to prevent flame-ups when cutting wood.
Another common mistake is ignoring the kerf—the width of the material removed by the laser. High-precision joints in CNC File designs account for kerf, but if your machine’s kerf differs significantly from the designer’s assumptions, your fit will be off. If you find your joints are too loose or too tight, adjust the offset settings in your software rather than altering the design geometry manually. This preserves the integrity of the original artwork while accommodating your machine’s specific behavior.
Enhancing the Final Product
Once the cutting is complete, the assembly process offers another opportunity to refine quality. Sanding the wooden components lightly before assembly can remove char marks and smooth rough edges, enhancing the tactile feel of the lamp. When inserting the acrylic, ensure it is clean and free of fingerprints, as these will be highlighted once the LED is turned on.
Choosing the right LED strip or bulb is also vital. Warm white LEDs complement the natural tones of wood, creating a cozy ambiance ideal for kids’ bedside lamps. Cool white LEDs may clash with the wood grain, creating a sterile look. Ensure the voltage and power requirements of your light source match your safety standards, especially if the lamp is intended for a child’s room.
Support and Customization
Even with careful preparation, questions may arise. Reputable designers understand that each maker’s setup is unique. If you encounter issues with file compatibility or need a different size, do not hesitate to reach out. Many creators offer support for their Wood Acrylic Glow Lamp Laser Cut products and may provide alternative file types or custom adjustments.
Before finalizing your purchase or starting your project, check the designer’s policy on support and updates. Following their shop or feed can also provide access to future releases and tips that refine your crafting process. Engaging with the community of makers allows you to share experiences, troubleshoot problems, and discover new techniques for improving your laser-cut projects.
By paying attention to file formats, material properties, and machine settings, you can transform a simple digital download into a breathtaking piece of functional art. The key is patience and precision. Take the time to understand the tools at your disposal, and your Animals LED Night Light or decorative table lamp will not only illuminate a room but also showcase your skill and attention to detail.